


零基础 Object-C 学习路线推荐 : Object-C 学习目录 >> Object-C 基础
零基础 Object-C 学习路线推荐 : Object-C 学习目录 >> Object-C 线程
零基础 Object-C 学习路线推荐 : Object-C 学习目录 >> OpenGL ES
零基础 Object-C 学习路线推荐 : Object-C 学习目录 >> GPUImage
零基础 Object-C 学习路线推荐 : Object-C 学习目录 >> AVFoundation
零基础 Object-C 学习路线推荐 : Object-C 学习目录 >> CocoaPods
一.UIImage 美白
/******************************************************************************************/
//@Author:猿说编程
//@Blog(个人博客地址): www.codersrc.com
//@File:Object-C UIImage 美白
//@Time:2021/10/11 08:00
//@Motto:不积跬步无以至千里,不积小流无以成江海,程序人生的精彩需要坚持不懈地积累!
/******************************************************************************************/
#define Mask8(x) ( (x) & 0xFF )
#define R(x) ( Mask8(x) )
#define G(x) ( Mask8(x >> 8 ) )
#define B(x) ( Mask8(x >> 16) )
#define A(x) ( Mask8(x >> 24) )
#define RGBAMake(r, g, b, a) ( Mask8(r) | Mask8(g) << 8 | Mask8(b) << 16 | Mask8(a) << 24 )
#pragma mark - 美白图片
/**
* 美白图片
* @param imageName 图片名称
* @param whiteness 美白系数 10-150之间 越大越白
*/
-(UIImage *)whiteImage:(UIImage *)image
Whiteness:(int)whiteness {
if (!whiteness || whiteness < 10 || whiteness > 150) {
return image;
}
// 1.拿到图片,获取宽高
CGImageRef imageRef =image.CGImage;
NSInteger width = CGImageGetWidth(imageRef);
NSInteger height = CGImageGetHeight(imageRef);
// 2:创建颜色空间(灰色空间, 彩色空间)-> 开辟一块内存空间
CGColorSpaceRef colorSpaceRef = CGColorSpaceCreateDeviceRGB();
// 3:创建图片上下文
// 为什么是UInt32类型,即是无符号32为int型 取值范围就是0-255之间
// inputPixels是像素点集合的首地址
UInt32 * inputPixels = (UInt32*)calloc(width * height, sizeof(UInt32));
CGContextRef contextRef = CGBitmapContextCreate(inputPixels,
width,
height,
8, // 固定写法 8位
width * 4, // 每一行的字节 宽度 乘以32位 = 4字节
colorSpaceRef,
kCGImageAlphaPremultipliedLast | kCGBitmapByteOrder32Big); // 自己查咯
// 4:根据图片上线纹绘制图片
CGContextDrawImage(contextRef, CGRectMake(0, 0, width, height), imageRef);
// 5:循环遍历每个像素点进行修改
for (int i = 0; i < height; i ++) {
for (int j = 0; j < width; j ++) {
UInt32 * currentPixels = inputPixels + (i * width) + j; // 改变指针的指向 每一个像素点都能遍历到了
UInt32 color = *currentPixels;
UInt32 colorA,colorR,colorG,colorB;
colorR = R(color); // 此处宏定义 计算RGBA的值 是通过位运算算的 自己百度咯
colorR = colorR + whiteness;
colorR = colorR > 255 ? 255 : colorR;
colorG = G(color);
colorG = colorG + whiteness;
colorG = colorG > 255 ? 255 : colorG;
colorB = B(color);
colorB = colorB + whiteness;
colorB = colorB > 255 ? 255 : colorB;
colorA = A(color);
*currentPixels = RGBAMake(colorR, colorG, colorB, colorA);
}
}
// 6:创建Image对象
CGImageRef newImageRef = CGBitmapContextCreateImage(contextRef);
UIImage * newImage = [UIImage imageWithCGImage:newImageRef];
// 7:释放内存
CGColorSpaceRelease(colorSpaceRef);
CGContextRelease(contextRef);
CGImageRelease(newImageRef);
free(inputPixels);
return newImage;
}
- (void)viewDidLoad {
[super viewDidLoad];
UIImage* srcImage = [UIImage imageNamed:@"123.png"];
UIImage* dstImage = [self whiteImage:srcImage Whiteness:50];
return;
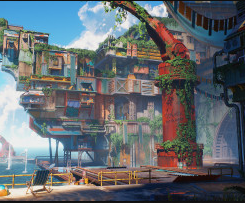
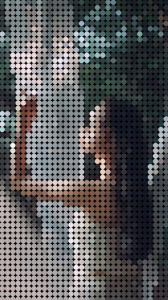
}原图:
![图片[1]-Object-C UIImage 美白-猿说编程](https://www.codersrc.com/wp-content/uploads/2021/10/202cb962ac59075-1.png)
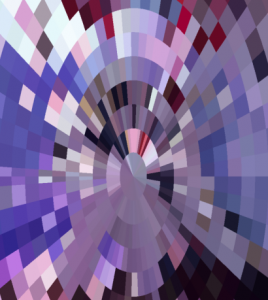
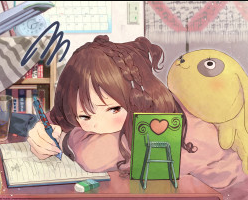
美白后:
![图片[2]-Object-C UIImage 美白-猿说编程](https://www.codersrc.com/wp-content/uploads/2021/10/ac3749bbc576433.png)
二.猜你喜欢
- iOS NSString 拆分字符串
- iOS NSString 截取字符串
- iOS NSString 和 NSArray 相互转换
- iOS NSString 包含字符串/匹配字符串
- iOS NSURL URLWithString 与 fileURLWithPath 区别
- iOS NSURL 与 NSString相互转换
- iOS NSString 获取中文字符串长度
- iOS NSString 判断字符串是否为空判
- iOS NSString 获取指定下标字符
- iOS NSString 匹配字符串开头
- iOS NSString 匹配字符串结尾
- iOS NSString 判断两个字符串是否相等
- iOS NSString 将字符串中的字母转换为大写
- iOS NSString 将字符串中的字母转换为小写
- iOS NSString 将字符串中的首字母变为大写
- iOS NSString 拼接字符串
- iOS NSString 插入字符串
- iOS NSString 删除字符串
- iOS NSNumber 和 int 相互转换
- iOS NSNumber compare 比较
- iOS NSNumber isEqualToNumber
- iOS NSValue 和 CGPoint 相互转换
- iOS NSValue 和 CGSize 相互转换
- iOS UIImage 与 RGBA 相互转换
- Object-C UIImage 缩放
- Object-C UIImage 裁剪
- Object-C UIImage 旋转
- Object-C UIImage 合并多张图片
- Object-C UIImage 黑白处理
- Object-C UIImage 美白
ChatGPT 3.5 国内中文镜像站免费使用啦
© 版权声明
文章版权归作者所有,未经允许请勿转载。
THE END
![模拟真人鼠标轨迹算法(支持C++/Python/易语言)[鼠标轨迹API简介]-猿说编程](https://winsdk.cn/wp-content/uploads/2024/11/image-3.png)


暂无评论内容